Using the circuit you built in figure 4 (the one with a switch and a light bulb) use your meter and find the voltages between the various points in the diagram below. Make sure you check your wiring and have your instructor check it before you plug it in or turn it on.
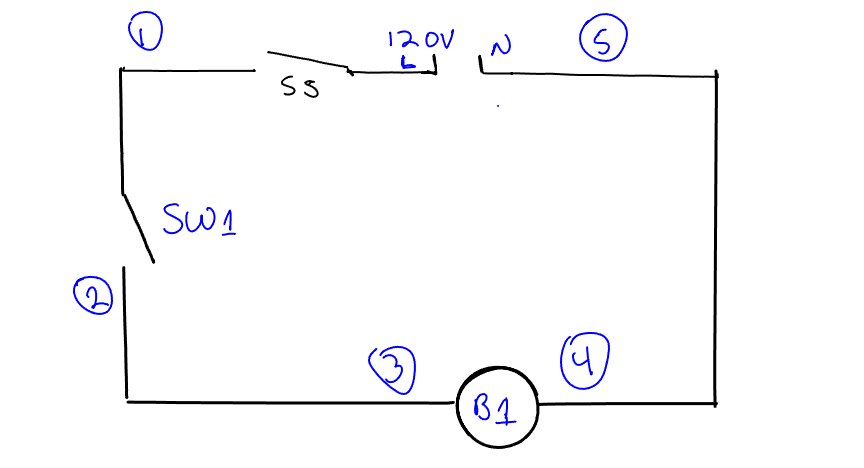
Figure 10 – Circuit from figure 4 with points marked
1. With SW1 Open find the Voltages between the following points:
| Point 1 | Point 2 | Voltage |
| 1 | 2 | |
| 1 | 3 | |
| 1 | 4 | |
| 1 | 5 | |
| 5 | 4 | |
| 5 | 3 | |
| 5 | 2 | |
| 5 | 1 |
2. Next, close SW1 and find the voltages between the following points:
| Point 1 | Point 2 | Voltage |
| 1 | 2 | |
| 1 | 3 | |
| 1 | 4 | |
| 1 | 5 | |
| 5 | 4 | |
| 5 | 3 | |
| 5 | 2 | |
| 5 | 1 |
3. Next, open SW1 and turn the power to the circuit off and unplug the trainer board. Using your Ohm meter check the resistance between the following points.
| Point 1 | Point 2 | Voltage |
| 1 | 2 | |
| 1 | 3 | |
| 1 | 4 | |
| 1 | 5 |
4. Next, close SW1, still with the circuit off and unplugged. Check the resistance between the following points.
| Point 1 | Point 2 | Voltage |
| 1 | 2 | |
| 1 | 3 | |
| 1 | 4 | |
| 1 | 5 |
5. Can you now match every one of these readings back to the basic rules of electrical we discussed earlier in this section? If you are unsure about any of them – go back and read section 4 and 5 again.
6. Once complete have your instructor initial the spot in this manual for completing shop #2. Note that your instructor may ask you to demonstrate the proper use of a meter and ask you to explain the reading you got.