Leak Detection and Leak Testing
A refrigeration system is designed to contain refrigerant within a sealed circuit. When that circuit leaks, refrigerant can escape, air and moisture may enter, system performance can deteriorate, and repeated charging can become both expensive and environmentally harmful. Finding and correcting leaks is therefore an essential HVAC/R service skill.
No single leak-detection method is ideal for every situation. Technicians combine visual inspection, electronic leak detectors, bubble solutions, pressure testing, system operating information, and good troubleshooting practices to locate leaks safely and accurately.
Learning Objectives
Recognize Leak Indicators
Identify common signs that suggest refrigerant may be escaping from a refrigeration system.
Select a Leak-Detection Method
Compare visual inspection, electronic leak detection, bubble testing, and nitrogen pressure testing.
Pressure Test Safely
Understand the proper use of dry nitrogen, regulators, gauges, and system pressure limitations.
Confirm the Repair
Verify that a leak has actually been corrected before evacuation and charging are completed.
A Refrigeration System Operates Under Difficult Conditions
Refrigeration systems experience pressure changes, temperature changes, vibration, thermal expansion and contraction, and mechanical stress throughout their operating lives. Connections, tubing, coils, valves, seals, and other components can eventually develop leaks.
Some leaks occur immediately after installation or repair because of an improperly made connection. Others develop slowly after years of operation.
Mechanical Connections
Flare fittings, threaded connections, service valves, access fittings, and other joints can leak if damaged, loose, improperly assembled, or improperly sealed.
Brazed Joints
Improperly prepared or brazed tubing joints can develop small leaks that may not become obvious until the system is pressurized.
Coils and Tubing
Corrosion, abrasion, vibration, physical damage, and manufacturing defects can create leaks in tubing and heat exchangers.
Service Components
Valve cores, valve stems, caps, pressure controls, transducers, and other components connected to the refrigerant circuit can become leak points.
Low Refrigerant Is a Condition — Not a Diagnosis
A system that has lost refrigerant may eventually operate with an insufficient charge, but abnormal system operation does not automatically prove that a leak exists. Airflow problems, restrictions, control problems, compressor problems, incorrect charging, and other faults can produce similar symptoms.
The technician should use system measurements and physical inspection to determine whether refrigerant loss is likely and then locate the leak rather than repeatedly adding refrigerant.
Use the Method Appropriate to the Situation
Leak detection is often a process rather than a single test. One method may identify the general area of a leak while another confirms the exact location.
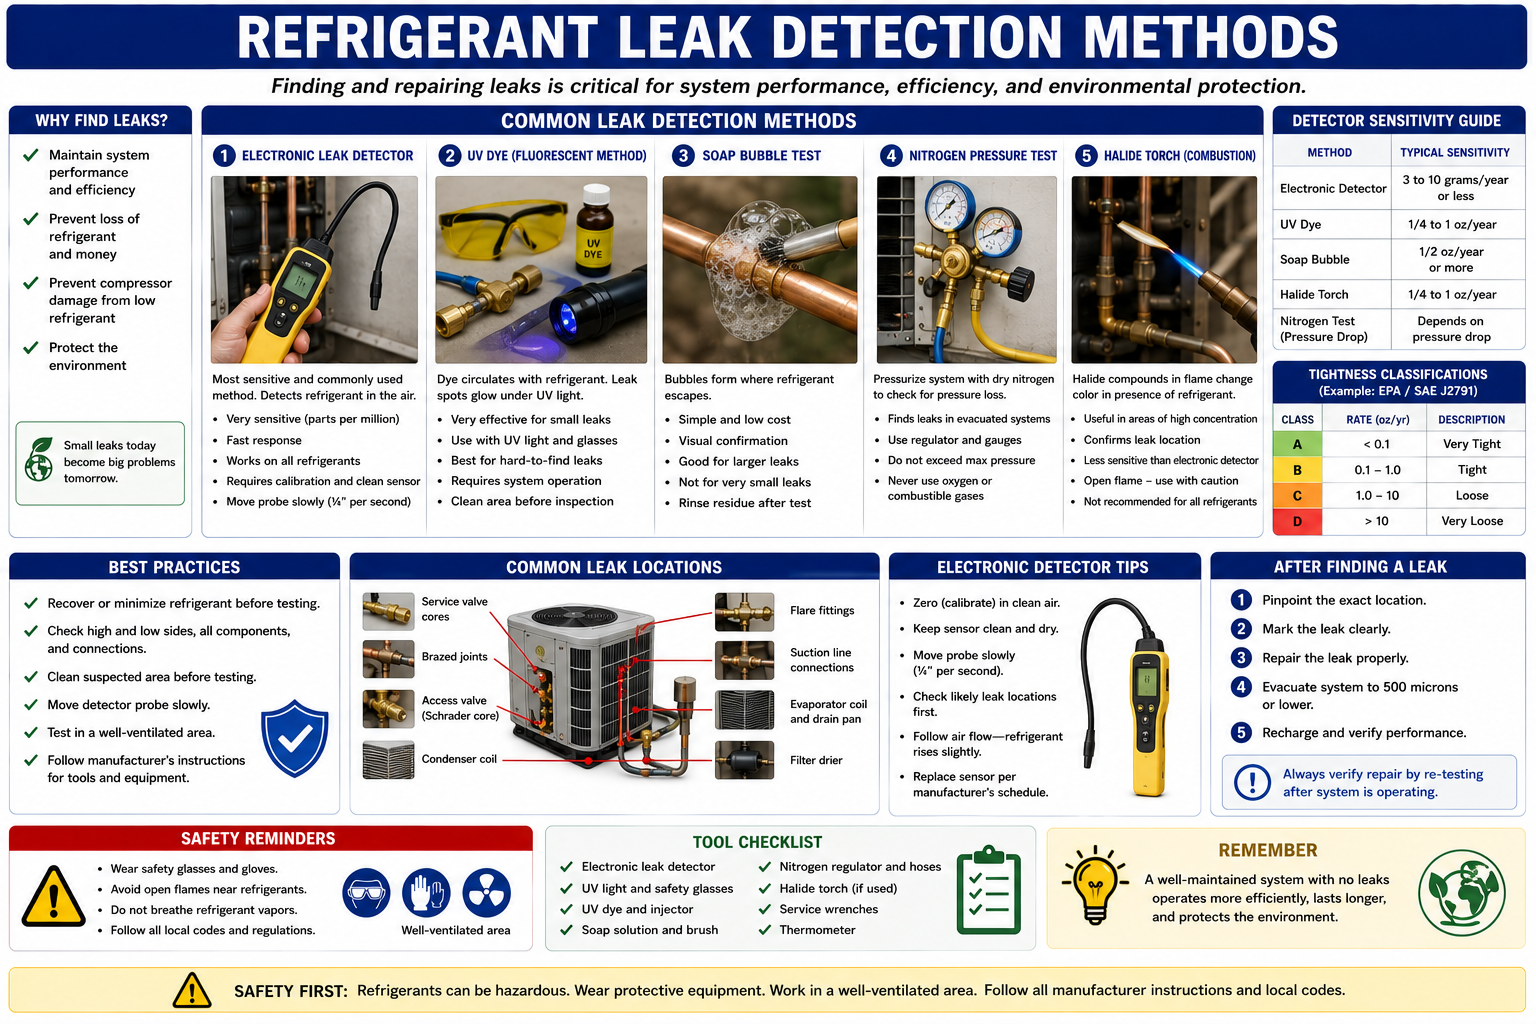
Visual Inspection
Look for oil residue, damaged tubing, corrosion, loose fittings, worn components, and evidence of previous refrigerant leakage.
Electronic Detection
An electronic detector can help locate small concentrations of refrigerant escaping from a system.
Bubble Solution
A suitable leak-detection solution can confirm the exact location of a leak by producing bubbles where gas escapes.
Pressure Testing
Dry nitrogen can pressurize an empty or appropriately prepared refrigeration circuit so leaks can be located without using refrigerant as the primary test gas.
Look Before Reaching for an Instrument
A careful visual inspection should be one of the first steps in leak detection. Refrigerant itself may evaporate without leaving an obvious visible trace, but circulating refrigeration oil can escape with the refrigerant and remain around the leak location.
Oil around a fitting, valve, coil return bend, brazed connection, or damaged section of tubing can therefore provide an important clue.
Oil Is Evidence — Not Proof
Oil residue identifies an area that deserves inspection, but old oil may remain from previous service or another source. Confirm the leak with an appropriate leak-detection method.
Finding Small Refrigerant Leaks
Electronic leak detectors are widely used because they can detect small concentrations of refrigerant that may not be obvious through visual inspection or bubble testing alone.
Detector technologies vary. The instrument must be suitable for the refrigerant being tested, and the technician must follow the detector manufacturer’s operating procedure.
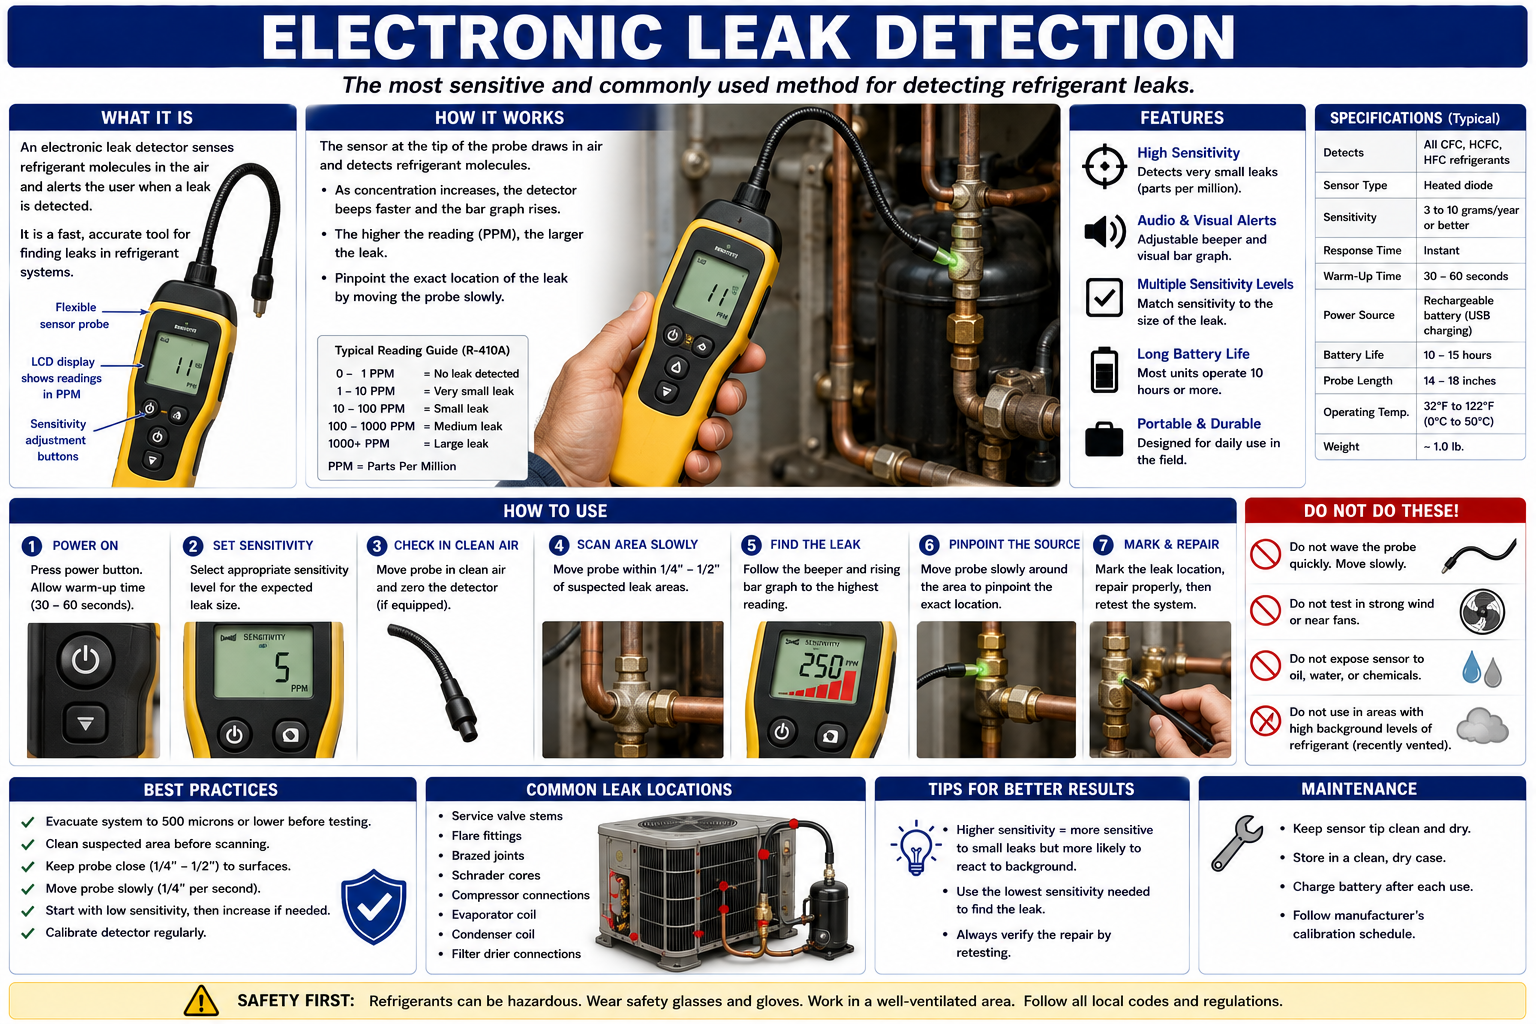
Verify the Detector
Confirm that the detector is appropriate for the refrigerant and is functioning correctly.
Inspect Likely Areas
Check joints, valves, coils, fittings, service ports, and other likely leak locations systematically.
Move Slowly
Follow the detector manufacturer’s instructions for probe movement and distance from the surface.
Confirm the Location
Repeat the test or use another appropriate method to verify the exact leak location before beginning a repair.
Where You Place the Detector Matters
Many common refrigerant vapors are denser than air and can move downward or accumulate in low areas, although air movement, temperature, ventilation, equipment fans, and the geometry of the work area can significantly affect where the refrigerant travels.
Do not assume refrigerant vapor will remain immediately beside the leak. Reduce unnecessary air movement when practical and use a systematic search pattern.
Simple and Effective for Pinpointing a Leak
A bubble solution can provide a direct visual indication of gas escaping from a pressurized refrigeration circuit. The solution is applied to a suspected leak location and observed for bubble formation.
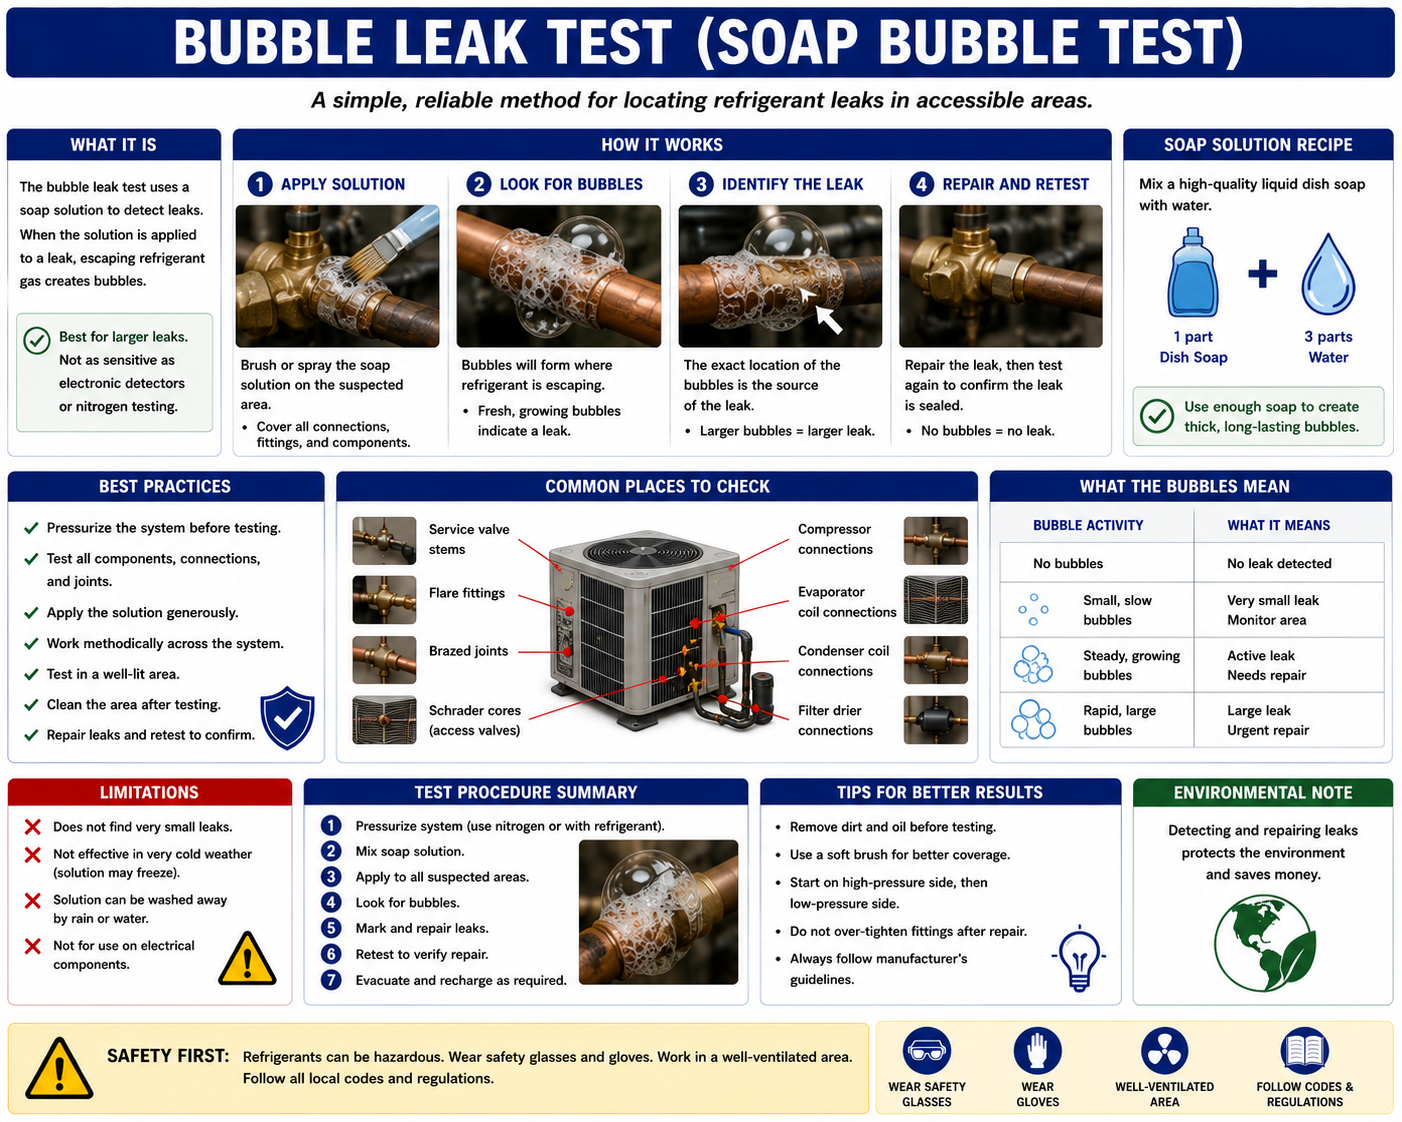
Very large leaks may blow the solution away rather than forming slow bubbles, while extremely small leaks may require time before visible bubbles develop.
Use an Appropriate Leak-Detection Solution
Use a product suitable for refrigeration service and the materials being tested. After testing, follow the product and equipment manufacturer’s instructions regarding removal of residue.
Using Dry Nitrogen
After a refrigeration system has been opened for installation or repair, technicians commonly pressure test it with dry nitrogen. Nitrogen allows the circuit to be pressurized without introducing oxygen or moisture into the system.
The nitrogen cylinder must be connected through an appropriate pressure regulator. Never connect a high-pressure nitrogen cylinder directly to a refrigeration system without a regulator.
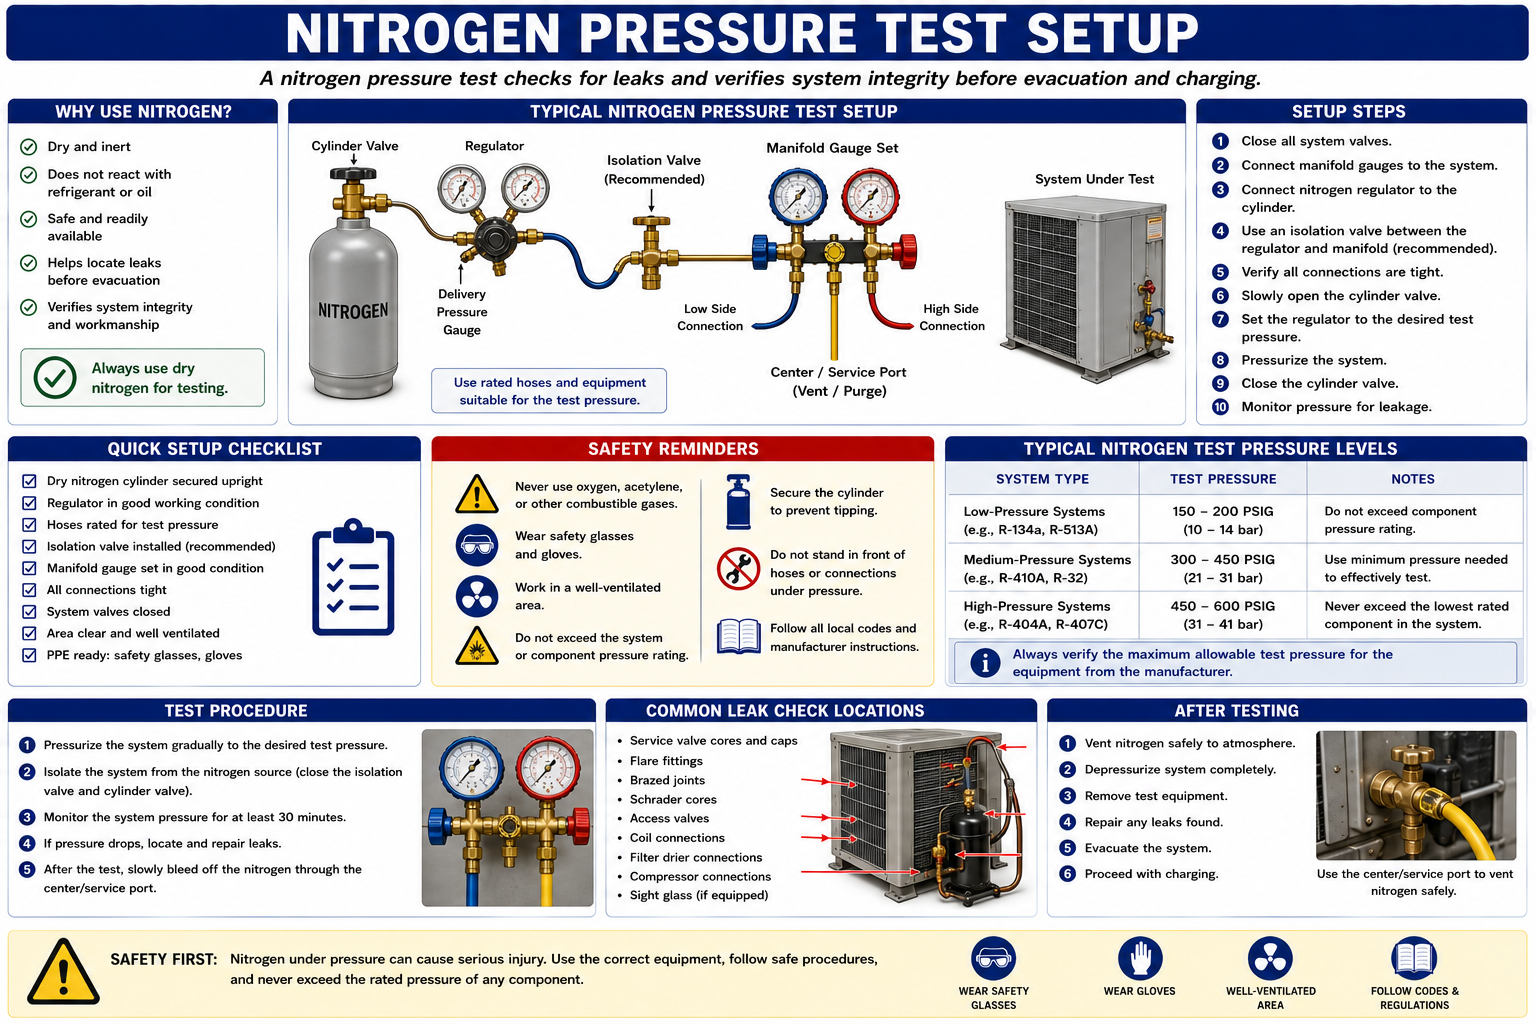
Never Use Oxygen or Compressed Air as a Substitute for Nitrogen
Oxygen or compressed air can react dangerously with refrigeration oil and other materials under pressure. Use dry nitrogen and follow the equipment manufacturer’s approved pressure-testing procedure.
Cylinder Pressure Must Be Controlled
A nitrogen cylinder can contain pressure far greater than a refrigeration system is designed to withstand. The regulator reduces and controls that cylinder pressure before nitrogen enters the refrigeration circuit.
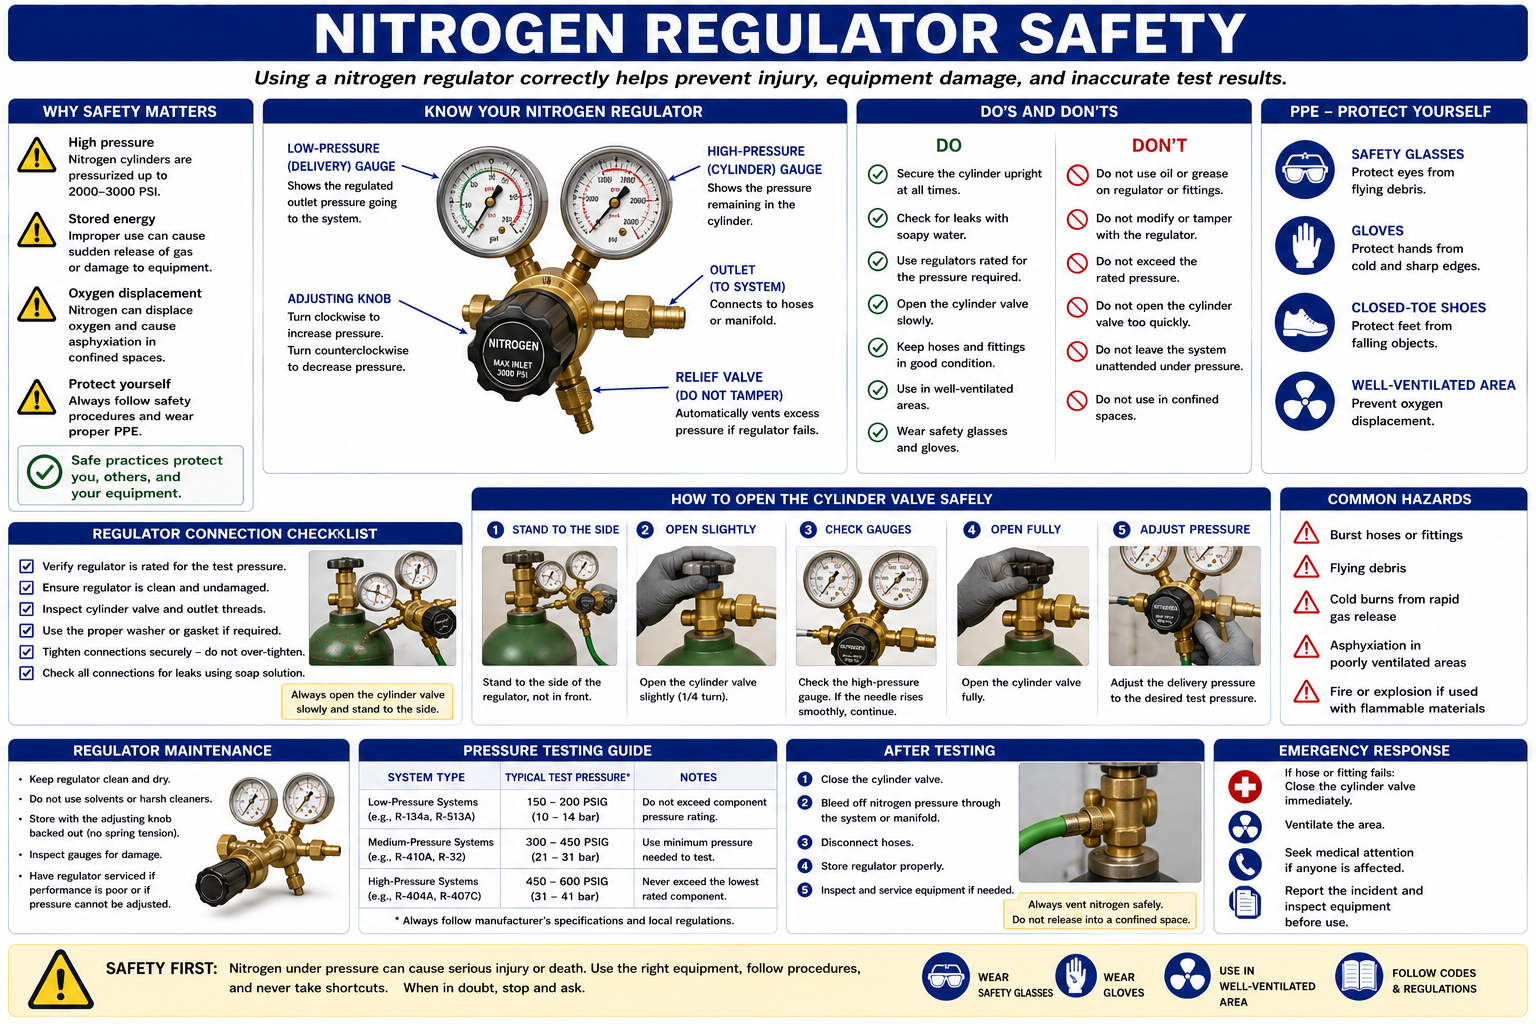
Know the Test Pressure
Determine the manufacturer’s permitted pressure-test value before introducing nitrogen.
Use the Correct Regulator
Use a regulator suitable for nitrogen service and capable of controlling the required outlet pressure.
Watch the Gauges
Monitor system pressure while nitrogen is introduced rather than assuming the regulator setting alone provides adequate protection.
Do Not Exceed Ratings
Never exceed the pressure rating of the equipment, component, gauge, hose, or other part of the test setup.
There Is No Universal Nitrogen Test Pressure
Different refrigeration systems have different allowable pressures. A pressure appropriate for one system may damage another.
Use the equipment manufacturer’s instructions and component pressure ratings to determine the correct test pressure. Pay particular attention to systems containing components with lower allowable pressures than the rest of the circuit.
Never Guess at Test Pressure
Do not select a nitrogen pressure simply because that pressure was used successfully on another system. Identify the allowable test pressure for the equipment being serviced.
A Falling Pressure Can Indicate a Leak — But Temperature Matters
After a system is pressurized with nitrogen and isolated, technicians may monitor pressure over time. A pressure decrease can indicate leakage, but gas pressure also changes when temperature changes.
If the system cools during the test, the pressure can decrease even when the circuit is perfectly sealed. Likewise, warming can cause pressure to rise.
Pressure Testing Tells You a Leak Exists — Then You Must Locate It
A standing-pressure test may demonstrate that a system is losing pressure, but it does not identify the leak location. Once leakage is suspected, inspect the system systematically with bubble solution, an appropriate electronic detector when applicable, or another approved method.
Start with the areas most likely to have been disturbed during installation or repair, but do not stop after finding the first leak. A system can contain more than one leak.
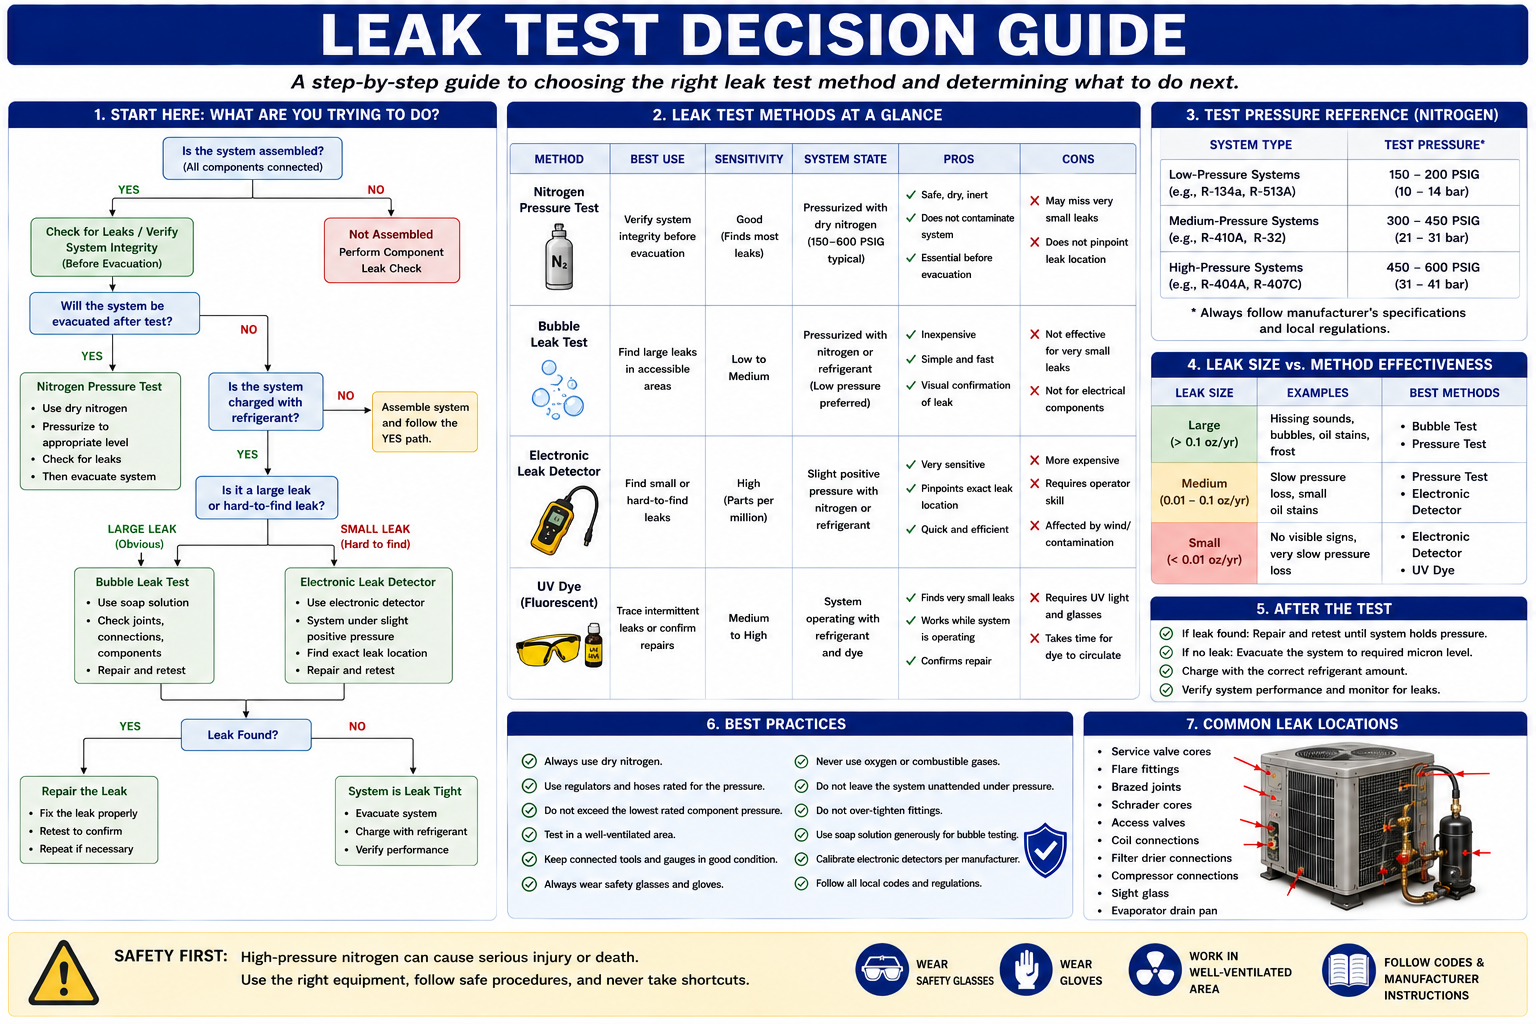
Leak-Test Decision Guide
Inspect
Look for oil, damage, corrosion, loose connections, previous repairs, and other evidence.
Detect
Use an appropriate electronic detector or other method to narrow the suspected leak area.
Confirm
Use bubble solution or another appropriate method to establish the exact leak location.
Repair and Retest
Correct the leak and repeat the appropriate test to verify that the repair is sound.
Flammability Adds Another Consideration
When leak testing equipment containing an A2L or A3 refrigerant, refrigerant accumulation can create a flammability hazard. The technician must consider ventilation, ignition sources, detector suitability, refrigerant concentration, and the manufacturer’s service procedure.
Use a Detector Suitable for the Refrigerant
Do not assume an electronic leak detector used for traditional A1 refrigerants is appropriate for every A2L or A3 refrigerant. Verify the detector manufacturer’s refrigerant compatibility and intended use.
Finding a Leak Is Not the End of the Test
After repairing a leak, pressure test or otherwise verify the repair according to the equipment manufacturer’s procedure. The system should not proceed directly to charging simply because the visible defect has been repaired.
Once leak integrity has been established, nitrogen used for pressure testing is released safely according to the service procedure, and the system can proceed to evacuation and dehydration before refrigerant charging when those procedures are required.
EPA Leak-Repair Requirements
Section 608 contains leak-repair requirements for certain appliances containing ozone-depleting refrigerants or substitute refrigerants when the appliance contains 50 pounds or more of refrigerant and exceeds the applicable annual leak-rate threshold.
The requirements vary by appliance category and regulatory circumstances. These regulatory leak-rate requirements should not be confused with good service practice: a smaller appliance that does not fall under those particular leak-repair provisions should still have leaks properly diagnosed and repaired.
Good Service Practice Goes Beyond the Regulatory Threshold
A leak does not become acceptable simply because an appliance contains less than 50 pounds of refrigerant. Correcting leaks improves reliability, protects the equipment, reduces refrigerant loss, and prevents repeated service calls.
Avoid These Shortcuts
Repeatedly Adding Refrigerant
Adding refrigerant may temporarily restore operation but does not locate or correct the reason the charge was lost.
Testing With Oxygen
Oxygen must not be used to pressure test refrigeration systems because of the potential for dangerous reactions with oil and other materials.
Exceeding Test Pressure
More pressure does not automatically make a better leak test and can damage the equipment.
Ignoring Temperature
A pressure change during a standing test may result from temperature change rather than leakage.
Stopping at the First Leak
Repairing one leak does not prove that another leak is not present elsewhere in the system.
Skipping the Retest
Every completed leak repair should be verified before evacuation and charging proceed.
What You Need to Remember
- Refrigerant is not consumed during normal operation of a sealed refrigeration system.
- If refrigerant has been lost, determine why it was lost rather than repeatedly adding refrigerant.
- Oil residue can help identify a possible refrigerant leak location.
- Electronic leak detectors must be suitable for the refrigerant being tested.
- Bubble solution can be used to pinpoint a leak in a pressurized system.
- Dry nitrogen is commonly used to pressure test refrigeration systems.
- Use a pressure regulator when introducing nitrogen from a cylinder.
- Never use oxygen to pressure test a refrigeration system.
- Do not exceed the manufacturer’s allowable test pressure or component pressure ratings.
- A decrease in standing nitrogen pressure can indicate a leak, but temperature changes must also be considered.
- Finding one leak does not prove there are no additional leaks.
- Always verify a leak repair before evacuation and charging.
- A2L and A3 leak detection requires consideration of ventilation and ignition hazards.
Review Questions
1. Is refrigerant normally consumed while a refrigeration system operates?
Answer: No. Refrigerant circulates within a sealed system. If the system loses refrigerant, the cause of that loss should be determined.
2. Why can oil residue indicate a refrigerant leak?
Answer: Refrigeration oil circulates with the refrigerant and can escape at a leak, leaving visible residue after the refrigerant evaporates.
3. What gas is commonly used to pressure test a refrigeration system?
Answer: Dry nitrogen.
4. Why is a regulator required on a nitrogen cylinder?
Answer: Nitrogen cylinder pressure can be much higher than the refrigeration system can safely withstand. The regulator controls the pressure delivered to the system.
5. Should oxygen be used to pressure test a refrigeration system?
Answer: No. Oxygen can react dangerously with refrigeration oil and other materials under pressure.
6. Does a decrease in nitrogen pressure always prove that a system is leaking?
Answer: No. Pressure also changes with temperature, so temperature conditions must be considered when evaluating a standing-pressure test.
7. What should be done after repairing a refrigerant leak?
Answer: Retest the system or repair using the appropriate procedure to verify that the leak has been corrected before proceeding to evacuation and charging.
8. Why might more than one leak-detection method be used?
Answer: One method may locate the general area while another method can confirm the exact leak location. Different leak sizes and system conditions may also respond better to different methods.
Lesson 25 Summary
- Refrigeration systems are designed to retain their refrigerant charge.
- Refrigerant loss indicates a leak, previous service loss, or another reason that should be identified.
- Visual inspection can reveal oil residue, corrosion, damage, and other possible leak indicators.
- Electronic detectors can locate small concentrations of escaping refrigerant.
- Bubble solutions are useful for confirming exact leak locations.
- Dry nitrogen is commonly used to pressure test refrigeration systems.
- Nitrogen cylinders must be used with an appropriate pressure regulator.
- Oxygen should never be used as a refrigeration-system pressure-test gas.
- Test pressure must remain within equipment and component pressure ratings.
- Temperature changes affect pressure during standing-pressure tests.
- Leak testing should proceed systematically rather than randomly.
- Finding one leak does not eliminate the possibility of additional leaks.
- A repaired leak must be retested before evacuation and charging.
- A2L and A3 refrigerants require additional consideration of ventilation and ignition hazards.
- Good service practice is to diagnose and repair refrigerant leaks rather than repeatedly adding refrigerant.